WireIt Guide
Warning: the Guide is not up-to-date for the WireIt 3 version...
This doc is still a work in progress
Overview
WireIt is an open-source javascript library to create web wirable interfaces for dataflow applications, visual programming languages, graphical modeling, or graph editors.
WireIt heavily relies on the YUI3 framework.
Terminology
1 Overview
1.1 Presentation
WireIt is an open-source javascript library to create web wirable interfaces for dataflow applications, visual programming languages, graphical modeling, or graph editors.
WireIt is tested on all A-Grade Browsers, although it might work with older versions of browsers and platforms. Please report your issues with specific browsers in the forum.
It uses the YUI library, the inputEx library for forms and fields, and excanvas for IE support of the canvas tag.
The code for Wireit is provided under MIT license.
1.2 Terminology
This section defines some concepts that will be used throughout this guide.
Wires and Terminals
Wires are pretty explicit. They connect two Terminals together :

Terminals are responsible for the graph edition :
- You can create a Wire by dragging a terminal to another one
- You can destroy all the wires connected to a terminal by clicking on the scissors
Terminals have various configuration options, such as the number of wires that can be connected to them, wether they are editable or not, or style informations about the wires that are connected. Check out this example to see some of those properties in action.
Containers
Containers are "boxes", containing one or more Terminals. Containers are willingly generic, so that an application can easily create custom Containers.
Layer
A Layer handles multiple containers and connected wires. It keeps an internal representation of the whole graph and is responsible for saving/loading a graph.
1.3 Core components and widgets
WireIt is able to draw several types of wires :
- Straight - draws a straight line
- Bezier - using bezier curves
- Arrow - for directed directed graphs
- BezierArrow - a mix of the two above
- Step - using only horizontal and vertical lines
Different types of Container are provided :
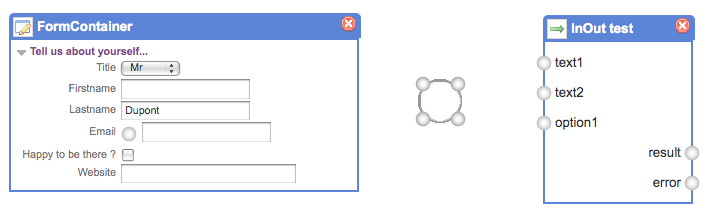
- InOutContainer - simple module with named inputs and outputs
- ImageContainer - use images as graph nodes
- FormContainer - displays a form with wirable inputs (optional). (requires the inputEx plugin)
1.4 Plugins
Introduced in version 0.6.0, plugins are separated from the core components to build à la carte applications.
All plugins are optional, although some of them have dependencies to others.
1.4.1 The inputEx plugin
The inputEx library and WireIt share the same creator, and their dependency to YUI. inputEx is an open-source javascript framework to build fields and forms. All the fields and forms are configured using JSON or created in Javascript. It provides a very efficient abstraction for building interactive web applications.
The inputEx plugin, besides containing the inputEx library, adds two major components :
- WirableField - replace the root inputEx.Field class to add a Terminal, to "wire" the field (optional)
- FormContainer - build form containers based on inputEx forms
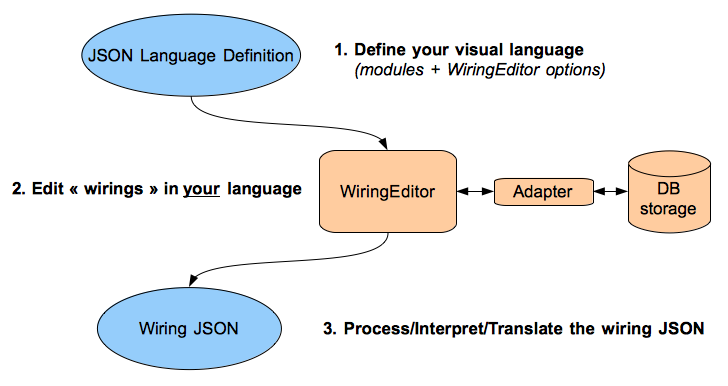
1.4.2 The editor plugin
The editor plugin provides another very useful component: the WiringEditor.
It provides the common features of most visual editors for your visual language.
1.4.3 Other plugins
- animations - utility to provide YUI Animations on any DOM element containing terminals
- composable - extends the WiringEditor with composable wirings (a wiring can use other wirings)
- grouping - extends the WiringEditor with module grouping feature (if you have large wirings)
- layout - provide functions to layout the Layer
2 Getting Started
Most of this guide explain the usage and customization of the WiringEditor. If you are not using it, you will still learn about customizing/creating containers, and the Wires/Terminals options.
2.1 Installation
WireIt is mostly a bunch of static javascript, css, and image files, so you can just download the latest version of the library and put the files in your project library directory.
However, the WiringEditor requires a database connection to use the save/load features. (see WiringEditor installation)
2.2 Directory structure
| file or directory | |
|---|---|
| api/ | Auto-generated API documentation |
| assets/ | Contains WireIt CSS and images |
| build/ | Contains the minified javascript (More on this in production) |
| examples/ | Examples or applications that are part of the library |
| images/ | WireIt images |
| index.html | WireIt Home page |
| js/ | javascript sources |
| lib/ | librairies required by WireIt core |
| license.txt | MIT license details |
| plugins/ | WireIt plugins directory |
| README.md | links for the GitHub page |
| res/ | resources for WireIt website and documentation |
| scripts/ | scripts to build rollup files and documentation |
| VERSION.txt | change log |
2.3 Create Your First WireIt Application
The easiest way to start creating your visual language is to copy one of the editor example from the plugins/editor/examples directory.
Depending on which default adapter you decided to use, copy the examples/gearsAdapter/ or examples/WiringEditor/ files into your project directory. (more on Adapters)
Edit the index.html file you copied to check that the paths to javascript and css files are correct. (You might want to create your project directory directly in the examples/ folder so that the paths remain unchanged.)
Setup a webserver to serve your files and launch the index.html file in your browser. You're ready to create your visual language !
3 Create your visual language
3.1 xtype convention
WireIt uses a convention to simplify extending widgets:
wires, terminals and containers are instantiated from the class specified by the xtype property.
It lets you create specialized widgets by creating a subclass and using it simply from your language definition.
3.2 Customizing Wires and Terminals
Many options are available to customize Wires and Terminals, but the general pattern is simple: you create a subclass of the Wire named WeirdWire, you use it using the xtype property :
Terminal.prototype.wireConfig = {"xtype":"WeirdWire", "weirdness": 7};
The code above overrides the default Wire configuration for all terminals on the page.
If you want to use this configuration only on specified wires, you can make it default for "some" terminals. You need to subclass the terminal to set your new config as default. An exemple is actually included in the library.
For a concrete example, let's see how the TerminalOutput works :
              	// use YUI class inheritance
              	Y.TerminalOutput = function(parentEl, options, container) {
              	   Y.TerminalOutput.superclass.constructor.call(this,parentEl, options, container);
              	};
              	Y.extend(Y.TerminalOutput, Y.Terminal, {
              	   xtype: "Y.TerminalOutput",

              		 // override some options
              		 direction: [0,1],
              		 fakeDirection: [0,-1],
              		 ddConfig: { type: "output", allowedTypes: ["input"] },
               	 	 alwaysSrc: true
              	});
Simple enough. What this says is: Create a TerminalOutput class which extends the Terminal widget, set the direction from top to bottom, and connect only to "input" terminals. The alwaysSrc option force this terminal as being the "source" terminal in the wire definition.
How do we handle the wire creation ? What are the options ?
The idea is to create a Drag'n Drop proxy element (we do not move the original Terminal, but a copy of it).
When we start dragging the proxy element, a fake terminal is created within, which we can move around. A wire is added between those two terminals.
You can change the default wiring config using the editingWireConfig property :
              	WeirdTerminal = function(parentEl, options, container) {
              	   WeirdTerminal.superclass.constructor.call(this,parentEl, options, container);
              	};
              	Y.extend(WeirdTerminal, Y.Terminal, {
              	   xtype: "WeirdTerminal",

              		 wireConfig: {"xtype":"WeirdWire", "weirdness": 7},
              		 editingWireConfig: {"xtype":"WeirdWire", "weirdness": 13},
              		 direction: [1,1],
              		 fakeDirection: [-1,-1]

              	});
3.3 Visual Language Definition
Your visual language is defined by a JSON object :
              	var myLanguageDef = {

              		// Set a unique name for your language
              		languageName: "myLanguage",


              		// modules: list of module type definitions
              		modules: [
              				{
              					name: "module1",
              					container: {"xtype":"Y.InOutContainer", ...}
              				},
              				...
              		]
              	};
This language definition is passed to the WiringEditor constructor :
                YUI_config.groups.wireit.base = '../src/';
                YUI({filter: 'raw', combine: false}).use('wire', 'bezier-wire', 'terminal', function(Y) {
              		try {
              			logicGates = new Y.WiringEditor(myLanguageDef);
              		}catch(ex) {
              			alert(ex);
              		}
              	});
3.4 Module Definition
Here is the skeleton of a module definition :
              {
               "name": "moduleName",

                // properties of the container
                "container": {

              		// which container class to use
              		"xtype":"Y.InOutContainer",

              		// The options depends of the container class used in xtype
              		"inputs": ["text1", "text2", "option1"],
              		"outputs": ["result", "error"]
                }
              }
To declare a module using a different Container class, you'll have to set the container xtype property.
Of course, you can use containers provided in WireIt (ImageContainer, FormContainer, InOutContainer), or a custom container.
3.5 Using the basic Container
Set "xtype": "WireIt.Container" (optional). The parameters are :
- icon - url of the icon (relative or absolute)
- terminals - list of terminals configuration
                  {
                     "name": "demoModule",
                     "container": {
                  		"xtype":"Y.Container",

              			"icon": "../../assets/application_edit.png",
                  		"terminals": [
                  			{"name": "_INPUT1", "direction": [-1,0], "offsetPosition": {"left": -3, "top": 2 }},
                  			{"name": "_INPUT2", "direction": [-1,0], "offsetPosition": {"left": -3, "top": 37 }},
                  			{"name": "_OUTPUT", "direction": [1,0], "offsetPosition": {"left": 103, "top": 20 }}
                  		]
                  	}
                  }
3.6 Using InOutContainer
Set "xtype": "WireIt.InOutContainer". Additional parameters are :
- inputs - list of inputs as strings
- outputs - list of outputs as strings
Example:
              {
               "name": "InOut test",
               "container": {
              	"xtype":"Y.InOutContainer",
              	"inputs": ["text1", "text2", "option1"],
              	"outputs": ["result", "error"]
                }
              }
3.7 Using FormContainer
Set "xtype": "Y.FormContainer". Additional parameters are all those used in inputEx.Group. (see inputEx)
              	{
              	  "name": "MyModule",
              	  "container": {
              		"xtype": "Y.FormContainer",

              		// inputEx options :
              		"title": "Y.FormContainer demo",
              		"collapsible": true,
              		"fields": [
              			{"type": "select", "label": "Title", "name": "title", "selectValues": ["Mr","Mrs","Mme"] },
              			{"type": "string", "label": "Firstname", "name": "firstname", "required": true },
              			{"type": "string", "label": "Lastname", "name": "lastname", "value":"Dupont"},
              			{"type":"email", "label": "Email", "name": "email", "required": true, "wirable": true },
              			{"type":"boolean", "label": "Happy to be there ?", "name": "happy" },
              			{"type":"url", "label": "Website", "name":"website", "size": 25 }
              		],
              		"legend": "Tell us about yourself..."

              	  }
              	}
3.8 Using ImageContainer
Set "xtype": "WireIt.ImageContainer". Additional parameters are :
- image - url of the image (relative or absolute)
                  {
                     "name": "AND gate",
                     "container": {
                  		"xtype":"Y.ImageContainer",
                  		"image": "../logicGates/images/gate_and.png",
                  		"terminals": [
                  			{"name": "_INPUT1", "direction": [-1,0], "offsetPosition": {"left": -3, "top": 2 }},
                  			{"name": "_INPUT2", "direction": [-1,0], "offsetPosition": {"left": -3, "top": 37 }},
                  			{"name": "_OUTPUT", "direction": [1,0], "offsetPosition": {"left": 103, "top": 20 }}
                  		]
                  	}
                  }
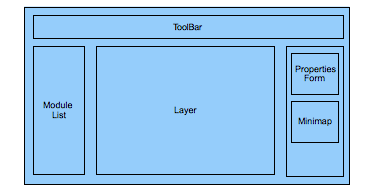
3.9 Edit the "Properties" form
To add properties to the Wirings, we configure the propertiesFields property of the language definition.
This property defines the fields as they will appear in the "Properties" form on the right in the WiringEditor.
The form is created using the inputEx form library. The propertiesFields array is directly used to instantiate a inputEx.Group class. Please refer to inputEx documentation to learn how to configure your fields.
When you use the save/load fetures of the WiringEditor, the form values are automatically saved within your wirings before being sent back to the server.
              	var demoLanguage = {

              		languageName: "meltingpotDemo",

              		// inputEx fields for pipes properties
              		propertiesFields: [
              			// default fields (the "name" field is required by the WiringEditor):
              			{"type": "string", "name": "name", label: "Title", typeInvite: "Enter a title" },
              			{"type": "text", "name": "description", label: "Description", cols: 30},

              			// Additional fields
              			{"type": "boolean", "name": "isTest", value: true, label: "Test"},
              			{"type": "select", "name": "category", label: "Category", selectValues: ["Demo", "Test", "Other"] }
              		],

              		modules: [
              			//...
              		]
              	};
3.10 Styling containers
The WiringEditor adds a CSS class for each module instance in your layer: WiringEditor-module-moduleName.
You can therefore style all the descending structure using cascaded style sheets.
Here is an exemple for the "comment" module of the WiringEditor demo.
              /* Comment Module */
              div.WireIt-Container.WiringEditor-module-comment {
              	width: 200px;
              }
              div.WireIt-Container.WiringEditor-module-comment div.body {
              	background-color: #EEEE66;
              }
              div.WireIt-Container.WiringEditor-module-comment div.body textarea {
              	background-color: transparent; font-weight: bold; border: 0;
              }
4 Adapters - Connecting to another database or backend
4.1 Introduction
Adapters are used by the WiringEditor to provide the loading/saving features. It makes it easy to "plug" the WiringEditor into your application. They usually connect to a database of some kind through Ajax calls to store the wirings and bring them back.
WireIt provides default adapters to get you started :
- Ajax Adapter (no backend provided)
- Json-RPC Adapter + a sample PHP/MySQL backend
- Gears Adapter (no backend required)
4.2 Configuring the adapter
              	// Override adapter default parameters
              	Y.WiringEditor.adapters.MyAdapter.config.configParam1 = value1;

              	// Instantiate the WiringEditor with a custom adapter
              	new Y.WiringEditor({
              		...
              		adapter: Y.WiringEditor.adapters.MyAdapter
              		...
              	})
4.3 Ajax Adapter
This adapter is the general way to connect to a custom backend through Ajax (or XHR) calls. It uses a JSON representation.
You can use it to connect to a REST resource store or any HTTP-based RPC backend.
The ajaxAdapter example connects to a fake backend (the queried URLs are static files), but demonstrate how to configure the adapter :
              	Y.WiringEditor.adapters.Ajax.config = 	{
              		saveWiring: {
              			method: 'GET',
              			// The url can be hard-coded
              			url: 'fakeSaveDelete.json'
              		},
              		deleteWiring: {
              			method: 'GET',
              			/**
              			 * 'url' can also be a function that returns the URL as a string.
              			 * For exemple, to connect to a REST store, you might want to send a DELETE /resource/wirings/moduleName
              			 * (moduleName is present in the "value" parameter)
              			 */
              			url: function(value) {
              				return "fakeSaveDelete.json";
              			}
              		},
              		listWirings: {
              			method: 'GET',
              			url: 'listWirings.json'
              		}
              	};
4.4 Json-RPC Adapter
This adapter uses Ajax calls as the previous one, but wraps http requests in a JSON-RPC envelope.
This adapter is used in the WiringEditor demo.
It is connected to a sample PHP/MySQL backend, which requires the following installtion steps :
- copy the backend/php directory to your wireit directory
- edit the script with your database access config (backend/php/WiringEditor.php)
- make sure the backend files are accessible by your webserver and that the php module is loaded
The JSON-RPC adapter configuration resides in the single service url :
Y.WiringEditor.adapters.JsonRpc.config.url = '/my/json-rpc/serviceUrl';
4.5 Gears Adapter
This adapter uses the database component of Google Gears to store the wirings in a SQLite table client-side (in the browser).
This adapter is very useful for prototyping your project, since it can be used without any server installation.
To use this adapter, you must install google gears.
A demo of this adapter is showed in the gears adapter example.
This adapter doesn't have any noticeable configuration except WireIt.WiringEditor.adapters.Gears.config.dbName which contains the gears database name (default is 'database-test').
4.6 Create an adapter
Why would you build your own ?
- You use a different server-side language
- You probably use a framework to develop your website, which provides its own models (ex: Django,Rails,Symfony,...)
- Convert the wirings into another workflow model. (ex: XProc XML)
Here is the skeleton of an adapter :
              Y.WiringEditor.adapters.MyAdapter = {

              	// adapter default options
              	config: {
              		// ...
              	},

              	// Initialization method called by the WiringEditor
              	init: function() {

              	},

              	/**
              	 * save/list/delete asynchronous methods
              	 */
              	saveWiring: function(val, callbacks) {
              		// ...
              		// don't forget to call the callbacks !
              	},

              	deleteWiring: function(val, callbacks) {
              		// ...
              		// don't forget to call the callbacks !
              	},

              	listWirings: function(val, callbacks) {
              		// ...
              		// don't forget to call the callbacks !
              	}

              	// + private methods or properties
              };

              })();
The main three methods use asynchronous callbacks to push back the results to the WiringEditor. Here is the structure of the callbacks that are passed to these methods :
              	var callbacks = {
              		success: function() {
              		},
              		failure: function() {
              		},
              		scope: this
              	};
To call the callbacks, in a synchronous way, use something like :
              	function(val, callbacks) {

              		if(everythingGoesFine) {
              			callbacks.success.call(callbacks.scope, results);
              		}
              		else {
              			callbacks.failure.call(callbacks.scope, results);
              		}

              	}
5 Working with Wirings
5.1 WiringEditor ouput format
First, here is the JSON output of the WiringEditor :
              var working = {
              	"modules":[
              		{
              			"config":{
              				"position":[166,195],
              				"xtype":"Y.ImageContainer"
              			},
              			"name":"AND gate",
              			"value":{}
              		},
              		{
              			"config":{
              				"position":[454,271],
              				"xtype":"Y.ImageContainer"
              			},
              			"name":"AND gate",
              			"value":{}
              		},
              		{
              			"config":{
              				"position":[149,403],
              				"xtype":"Y.ImageContainer"
              			},
              			"name":"AND gate",
              			"value":{}
              		}
              	],

              	"wires":[
              		{
              			"src":{"moduleId":0,"terminal":"_OUTPUT"},
              			"tgt":{"moduleId":1,"terminal":"_INPUT1"}
              		},
              		{
              			"src":{"moduleId":2,"terminal":"_OUTPUT"},
              			"tgt":{"moduleId":1,"terminal":"_INPUT2"}
              		}
              	],

              	"properties":{
              		"name":"demo",
              		"description":"",
              		"isTest":true,
              		"category":"Demo"
              	}
              };
First comes the list of instantiated modules. The name is set to the module name, config.xtype indicates the container class, config.position is pretty self-explanatory, and value contains the exported value for this instance (in this case it is empty, but for a FormContainer, it will contain the form value.)
Secondly, the wires instances, composed of a src (source) terminal and a tgt (target) terminal.
Each terminal is referenced by its moduleId (module index in the above definition) and its name (terminal).
Finally, the properties object contains the value of the "Properties" form on the right of the editor.
5.2 Converting the format
Usually, the WiringEditor is used as a visual editor for another kind of system.
You can convert the Wiring JSON to any other format, as long as you're able to rebuild the Wiring JSON format to edit the wiring in the editor.
This conversion can occur in two places :
- Client-side: by writing a custom Adapter
- Server-side: parse the incoming JSON and convert it
5.3 Storing wirings
The examples store directly the wiring JSON in a TEXT column in the database. It makes it impossible to query using standard SQL.
If you need to query the wirings, two options are available :
- Parse the JSON (all programming languages now have decent JSON stringify/parse methods) and convert the wiring to another format.
You will also need to convert your model back to the WireIt format to load it in the editor.
(The GraphPipes application for example stored the wirings into 3 different tables: pipes, nodes and edges.) - Use a JSON-based document database, such as CouchDB or mongoDB.
6 Creating custom Containers
6.1 YUI Inheritance
YUI 3 is used all over the place in Y.WireIt. We especially use Y.extend for setting up the prototype, constructor, and superclass properties for objects that are extending other objects.
The pattern for this type of inheritance is quite easy :
              	Class1 = function(info) {
              	    alert("Class1: " + info);
              	};

              	Class1.prototype.testMethod = function(info) {
              	    alert("Class1: " + info);
              	};

              	Class2 = function(info) {
              	    // chain the constructors
              	    Class2.superclass.constructor.call(this, info);
              	    alert("Class2: " + info);
              	};

              	// Class2 extends Class1.  Must be done immediately after the Class2 constructor
              	Y.extend(Class2, Class1);

              	Class2.prototype.testMethod = function(info) {
              	    // chain the method
              	    Class2.superclass.testMethod.call(this, info);
              	    alert("Class2: " + info);
              	};

              	var class2Instance = new Class2("constructor executed");
              	class2Instance.testMethod("testMethod invoked");
6.2 Creating new Containers / Extending existing containers
The general way to create a new Container class is to extend the Y.Container class. We do this YUI-style :
              	Y.MyContainer = function(options, layer) {
              	   Y.MyContainer.superclass.constructor.call(this, options, layer);
              	};
              	Y.extend(Y.MyContainer, Y.Container, {

              		setOptions: function(options) {
              	      MyContainer.superclass.setOptions.call(this, options);
              	      this.options.xtype = "MyContainer";
              	   }

              		// Override other methods or add new ones...

              	});
6.3 Example - Logic Gates
The logic gates application is a great example to create custom containers. The goal here is to make an interactive logic circuit.
First, we create the LogicContainer class, which inherits ImageContainer :
              	LogicContainer = function(opts, layer) {
              		LogicContainer.superclass.constructor.call(this, opts, layer);
              		this.logicInputValues = [];
              	};
              	Y.extend(LogicContainer, Y.ImageContainer, {

              		setOptions: function(options) {
              	      LogicContainer.superclass.setOptions.call(this, options);
              	      this.options.xtype = "LogicContainer";
              	   }
              	});
The logicInputValues variable will keep the values of the input terminals.
Then we add 3 functions : setInput is used to set the logic state of an input terminal, setLogic updates the output of the container and calls setInput on each connected component, and switchStatus simply inverts the output status of the container :
              	setInput: function(bStatus,term) {
              			this.logicInputValues[term.options.name] = bStatus;

              			if(this.options.title == "AND") {
              				this.setLogic( this.logicInputValues["_INPUT1"] && this.logicInputValues["_INPUT2"]  );
              			}
              			else if (this.options.title == "OR") {
              				this.setLogic( this.logicInputValues["_INPUT1"] || this.logicInputValues["_INPUT2"]  );
              			}
              			else if (this.options.title == "NOT") {
              				this.setLogic(!this.logicInputValues["_INPUT"]);
              			}
              			else if (this.options.title == "NAND") {
              				this.setLogic( !(this.logicInputValues["_INPUT1"] && this.logicInputValues["_INPUT2"])  );
              			}
              			else if (this.options.title == "XOR") {
              				this.setLogic( (!this.logicInputValues["_INPUT1"] && this.logicInputValues["_INPUT2"]) ||
              				  					(this.logicInputValues["_INPUT1"] && !this.logicInputValues["_INPUT2"]) );
              			}
              		},

              		setLogic: function(bStatus) {
              			this.status = bStatus;

              			// Set the image
              			if(this.imageName) {
              				var image = this.imageName+"_"+(bStatus ? "on" : "off")+".png";
              				Y.one(this.bodyEl).setStyle("backgroundImage", "url(images/"+image+")");
              			}

              			// trigger the output wires !
              			for(var i = 0 ; i < this.terminals.length ; i++) {
              				var term = this.terminals[i];
              				if(term.options.name == "_OUTPUT") {
              					for(var j = 0 ; j < term.wires.length ; j++) {
              						var wire = term.wires[j];
              						var otherTerm = wire.getOtherTerminal(term);
              						if(otherTerm.container) {
              							otherTerm.container.setInput(bStatus, otherTerm);
              						}
              						wire.options.color = bStatus ? "rgb(173,216,230)" : "rgb(255,255,255)";
              						wire.redraw();
              					}
              				}
              			}
              		},
              		switchStatus: function() {
              			this.setLogic(!this.status);
              		}
Then, we create containers that will inherit the LogicContainer class :
              /**
               * ClockContainer will call the switchStatus method every 800ms
               */
              ClockContainer = function(opts, layer) {
              	ClockContainer.superclass.constructor.call(this, opts, layer);
              	this.imageName = "clock";
              	var that = this;
              	setInterval(function() { that.switchStatus();	}, 800);
              };
              Y.extend(ClockContainer, LogicContainer, {
              	setOptions: function(options) {
                    ClockContainer.superclass.setOptions.call(this, options);
                    this.options.xtype = "ClockContainer";
                 }
              });

              /**
               * SwitchContainer will call the switchStatus method when the user click on it
               */
              SwitchContainer = function(opts, layer) {
              	SwitchContainer.superclass.constructor.call(this, opts, layer);
              	this.imageName = "switch";
              	Y.one(this.bodyEl).on("click", this.switchStatus, this, true);
              };
              Y.extend(SwitchContainer, LogicContainer, {
              	setOptions: function(options) {
                    SwitchContainer.superclass.setOptions.call(this, options);
                    this.options.xtype = "SwitchContainer";
                 }
              });

              /**
               * LightBulb will call the setLogic method to update its image each time the input value changes
               */
              LightbulbContainer = function(opts, layer) {
              	LightbulbContainer.superclass.constructor.call(this, opts, layer);
              	this.imageName = "lightbulb";
              };
              Y.extend(LightbulbContainer, LogicContainer, {
              	setInput: function(bStatus,term) {
              		this.setLogic(bStatus);
              	},
              	setOptions: function(options) {
                    LightbulbContainer.superclass.setOptions.call(this, options);
                    this.options.xtype = "LightbulbContainer";
                 }
              });
We can now write our language definition using the created container classes using the xtype attribute :
              	var logicGatesLang = {
              		languageName: "logicGates",
              		modules: [
              			{
              				"name": "AND",
              				"category": "gate",
              				"description": "AND Gate with 2 inputs",
              				"container" : {
              					"xtype":"LogicContainer",
              					"icon": "../logicGates/images/gate_and.png",
              					"image": "../logicGates/images/gate_and.png",
              	  				"terminals": [
              	  					{"name": "_INPUT1", "direction": [-1,0], "offsetPosition": {"left": -16, "top": -2 },"ddConfig": {"type": "input","allowedTypes": ["output"]}, "nMaxWires": 1 },
              	  					{"name": "_INPUT2", "direction": [-1,0], "offsetPosition": {"left": -16, "top": 25 },"ddConfig": {"type": "input","allowedTypes": ["output"]}},
              	  					{"name": "_OUTPUT", "direction": [1,0], "offsetPosition": {"left": 65, "top": 12 },"ddConfig": {"type": "output","allowedTypes": ["input"]}}
              	  				]
              				}
              			},
              			{
              			  "name": "OR",
              				"category": "gate",
              				"description": "OR Gate with 2 inputs",
              				"container": {
              			   		"xtype":"LogicContainer",
              			   		"icon": "../logicGates/images/gate_or.png",
              			   		"image": "../logicGates/images/gate_or.png",
              						"terminals": [
              							{"name": "_INPUT1", "direction": [-1,0], "offsetPosition": {"left": -16, "top": -2 },"ddConfig": {"type": "input","allowedTypes": ["output"]}, "nMaxWires": 1 },
              							{"name": "_INPUT2", "direction": [-1,0], "offsetPosition": {"left": -16, "top": 25 },"ddConfig": {"type": "input","allowedTypes": ["output"]}},
              							{"name": "_OUTPUT", "direction": [1,0], "offsetPosition": {"left": 65, "top": 12 },"ddConfig": {"type": "output","allowedTypes": ["input"]}}
              						]
              				}
              			},
              			{
              			  "name": "NOT",
              				"category": "gate",
              				"description": "NOT Gate with 1 input",
              			  "container": {
              					"xtype":"LogicContainer",
              				   "icon": "../logicGates/images/gate_not.png",
              				   "image": "../logicGates/images/gate_not.png",
              					"terminals": [
              						{"name": "_INPUT", "direction": [-1,0], "offsetPosition": {"left": -21, "top": 12 },"ddConfig": {"type": "input","allowedTypes": ["output"]}, "nMaxWires": 1 },
              						{"name": "_OUTPUT", "direction": [1,0], "offsetPosition": {"left": 70, "top": 12 },"ddConfig": {"type": "output","allowedTypes": ["input"]}}
              					]
              				}
              			},
              			{
              			   "name": "NAND",
              				"category": "gate",
              				"description": "NAND Gate with 2 inputs",
              			   "container": {
              				   "xtype":"LogicContainer",
              				   "icon": "../logicGates/images/gate_nand.png",
              				   "image": "../logicGates/images/gate_nand.png",
              					"terminals": [
              						{"name": "_INPUT1", "direction": [-1,0], "offsetPosition": {"left": -16, "top": -2 },"ddConfig": {"type": "input","allowedTypes": ["output"]}, "nMaxWires": 1 },
              						{"name": "_INPUT2", "direction": [-1,0], "offsetPosition": {"left": -16, "top": 25 },"ddConfig": {"type": "input","allowedTypes": ["output"]}, "nMaxWires": 1 },
              						{"name": "_OUTPUT", "direction": [1,0], "offsetPosition": {"left": 65, "top": 12 }, "ddConfig": {"type": "output","allowedTypes": ["input"]}}
              					]
              				}
              			},
              			{
              			   "name": "XOR",
              				"category": "gate",
              				"description": "XOR Gate with 2 inputs",
              			   "container": {
              			   	"xtype":"LogicContainer",
              			   	"icon": "../logicGates/images/gate_xor.png",
              			   	"image": "../logicGates/images/gate_xor.png",
              					"terminals": [
              						{"name": "_INPUT1", "direction": [-1,0], "offsetPosition": {"left": -16, "top": -2 },"ddConfig": {"type": "input","allowedTypes": ["output"]}, "nMaxWires": 1 },
              						{"name": "_INPUT2", "direction": [-1,0], "offsetPosition": {"left": -16, "top": 25 },"ddConfig": {"type": "input","allowedTypes": ["output"]}, "nMaxWires": 1 },
              						{"name": "_OUTPUT", "direction": [1,0], "offsetPosition": {"left": 65, "top": 12 },"ddConfig": {"type": "output","allowedTypes": ["input"]}}
              					]
              				}
              			},
              			{
              				"name": "Lightbulb",
              				"category": "output",
              				"description": "Lamp display",
              				"container" : {
              					"xtype":"LightbulbContainer",
              					"icon": "../logicGates/images/lightbulb_off.png",
              					"image": "../logicGates/images/lightbulb_off.png",
              	  				"terminals": [ {"name": "_INPUT", "direction": [0,1], "offsetPosition": {"left": 5, "bottom": -10 },"ddConfig": {"type": "input","allowedTypes": ["output"]}, "nMaxWires": 1 } ]
              				}
              			},
              			{
              				"name": "Switch",
              				"category": "input",
              				"description": "Switch",
              				"container" : {
              					"xtype":"SwitchContainer",
              					"icon": "../logicGates/images/switch_off.png",
              					"image": "../logicGates/images/switch_off.png",
              	  				"terminals": [ {"name": "_OUTPUT", "direction": [1,0], "offsetPosition": {"right": 6, "top": 11 },"ddConfig": {"type": "output","allowedTypes": ["input"]}} ]
              				}
              			},
              			{
              				"name": "Clock",
              				"category": "input",
              				"description": "Clock",
              				"container" : {
              					"xtype":"ClockContainer",
              					"icon": "../logicGates/images/clock_off.png",
              					"image": "../logicGates/images/clock_off.png",
              	  				"terminals": [ {"name": "_OUTPUT", "direction": [1,0], "offsetPosition": {"right": 7, "top": 5 },"ddConfig": {"type": "output","allowedTypes": ["input"]}} ]
              				}
              			}
              		]
              	};
Finally, we add some styling on the generated CSS classes :
              	div.WireIt-Container-closebutton { top: -16px; }
              	div.WireIt-ImageContainer div.body { width: 85px; }

              	div.WiringEditor-module-Lamp { height:100px; width:55px; }
              	div.WiringEditor-module-Lamp div.body {	height:70px; width:50px; }

              	div.WiringEditor-module-Clock { height:100px; width:80px; }
              	div.WiringEditor-module-Clock div.body { height:70px; width:50px; }

              	div.WiringEditor-module-Switch { height:60px; width:74px; }
              	div.WiringEditor-module-Switch div.body { height:45px; width:80px; }

              	.WiringEditor-module span { display: none; }
              	.WiringEditor-module { float: left; }
7 The Composable plugin
7.1 Introduction
The composable plugin is an extension to the editor plugin.
It is meant to make Wirings re-usable in other Wirings as a single-module. Check out the jsBox example, and try to compose some modules.
This plugin adds two components: ComposableWiringEditor and ComposedContainer.
7.2 How does it work
The first component, ComposableWiringEditor, extends the WiringEditor by :
- Adding two core modules to the language: input and output
- Adding saved wirings to the module list as ComposedContainer
The input module takes advantage of the inputEx TypeField. The TypeField is an inputEx field, which output value is an inputEx field definition. (inputEx's strange loop)
The second component, is the ComposedContainer :
- inherits from FormContainer
- The "input" modules of the wirings are combined into a form
- The "output" modules are represented by terminals
8 Advanced Topics
8.1 WiringEditor autoload feature
The WiringEditor has an option called autoload.
This is a parameter passed in the URL that tells the WiringEditor which wiring to open when the editor is displayed.
http://myhost.com/editor/?autoload=myWiring
For example, here is a direct link to the "guideAutoloadDemo" wiring of the WiringEditor example :
examples/WiringEditor/?autoload=guideAutoloadDemo
8.2 Handling Wire mouse events
There are two methods to handle wire mouse events :
-
Listen to wire events (recommanded)
wire.on('eventMouseIn', wireRed, wire, true); wire.on('eventMouseOut', wireBlue, wire, true); wire.on('eventMouseClick', wireClick, wire, true); -
Override Wire.prototype methods
              			Wire.prototype.onWireIn = function(x,y) {
              			};

              			Wire.prototype.onWireOut = function(x,y) {
              			};

              			Wire.prototype.onWireClick = function(x,y) {
              			};
Here is an example to create a random layer and lister for wire events :
              	// Functions executed with the scope of a wire
              	var wireRed = function() {
              			this.options.color = 'rgb(255, 0, 0)';
              	  		this.redraw();
              		},
              		wireBlue = function() {
              			this.options.color = 'rgb(173, 216, 230)';
              			this.redraw();
              		},
              		wireClick = function() {
              			alert("Hoho ! you clicked !");
              		};

              	// Generate a random layer
              	var layer = new Y.Layer({});
              	for(var i = 0 ; i < 5 ; i++) {
              		layer.addContainer({
              			terminals: [ {direction: [0,1], offsetPosition: {bottom: -13, left: 25} }],
              			title: "Block #"+i,
              			position: [ Math.floor(Math.random()*800)+30, Math.floor(Math.random()*300)+30 ]
              		});
              	}

              	for(var i = 0 ; i < 7 ; i++) {

              		var w = layer.addWire({
              			src: {moduleId: Math.floor(Math.random()*5), terminalId: 0},
              			tgt: {moduleId: Math.floor(Math.random()*5), terminalId: 0}
              		});

              		// Subscribe methods to mouse events for all wires
              		w.on('eventMouseIn', wireRed, w, true);
              		w.on('eventMouseOut', wireBlue, w, true);
              		w.on('eventMouseClick', wireClick, w, true);
              	}
8.3 notes on production
In a production environment, it is preferable to use rollup files: The javascript files are concatenated into a single javascript file (to reduce the number of HTTP requests) then compressed using the YUI compressor (to reduce file size).
Some rollup files are provided in the wireit/build directory :
<script type="text/javascript" src="lib/wireit/build/wireit-min.js"></script>
or
<script type="text/javascript" src="lib/wireit/build/wiring-editor-min.js"></script>
Warning :The rollup files don't include the excanvas.js library required by Internet Explorer, because this file is conditionally loaded using the "if IE" hack :
<!--[if IE]><script type="text/javascript" src="../../lib/excanvas.js"></script><![endif]-->
Warning :The wiring-editor-min.js file doesn't include any adapter, and only includes some fields of the inputEx library.
Moreover, the WireIt zip file contains example, guides, documentation, which are not necessary in a production environment. We recommend you to copy only the required files on your webserver :
              	wireit/
               	 - assets/
               	 - build/
               	 - js/
               	 - lib/
              	 - plugins/
9 Contribute
9.1 Reporting an Issue
The issues/bugs and feature requests are managed through the GitHub issue tracker. Feel free to add new ones, vote for your favorites, comment on existing one, ...
Then don’t get your hopes up. Unless you have a "Code Red, Mission Critical, The World is Coming to an End" kind of bug, you’re creating this ticket in the hope that others with the same problem will be able to collaborate with you on solving it. Do not expect that the ticket automatically will see any activity or that others will jump to fix it. Creating a ticket like this is mostly to help yourself start on the path of fixing the problem and for others to confirm it with a "I’m having this problem too" comment. (shamelessly copied from Rails guide)
9.2 Contributing to the Documentation
This guide represents the biggest documentation effort of the library. The API documentation is also a huge part of WireIt's documentation. How can you help ?
- fix typos, spelling
- improve code documentation (and therefore the auto-generated API documentation)
- write new examples
- write about uncovered topics
9.3 Contributing to the Code
You can contribute in a lot of different ways :
- Design/Styling - images or css
- Adapters/backend code
- core contributions (see the roadmap)
9.4 Contributors
Special thanks to the major contributors :
- neyric - creator
- jamesk and ciaranj - grouping plugin
- Barun - Left/Right square Arrow Wire
- Tarpipe - bug fixes, css, images
- LeifW - bug reports, forum replies
- dlitz - bug fix
- piercus - bug fix
- Jonathan L. - feature requests, blog post
- maximerety - major contributor on the inputEx library
9.5 Donate
If you use this project in a commercial application, or simply wish to see this project continue, you can donate on PayPal. Donations will be used for WireIt development and promotion.

9.6 Roadmap
Here is a list of the main requested features. Please note that this is a wish-list, it's not always what the developers are currently working on.
-
Improve Layout
WireIt has proven useful for graph editing, but it is also very good at data visualization.
However, the current layout engine still has a long way to go... -
Improve the WiringEditor
Keep improving this strong application framework.
-
Progressive enhancement
The idea is to generate containers/terminals/wires from existing HTML. This is especially useful for wirings to be indexable by search engines.
-
Provide more backends/adapters
New backends/code generators to increase development speed.
Although the backend largely depends on your project, it would be nice to have one for each major framework: Rails, Django, Symfony, AppEngine, ...
10 Other resources
10.1 All examples
- Interactive presentation
- Creating terminals and wires
- Changing terminal direction
- Wire and Terminals configuration
- Using animation
- Planar game
- Wire labels
- Label Containers
WiringEditor :
Beta/Experimental :
10.2 API References
Deeper hacking into WireIt might require some knowledge in the libraries used :
10.3 Other resources
- You can get some help on the forum.
- Project home page
- Source code repository on GitHub
- Issue tracker
- WireIt Blog
- WireIt changelog on twitter
Blog Posts :
10.4 WireIt-based projects
- Tarpipe - share content across social applications
- Pipescape - a WireIt interface to XProc
- Graphpipes - easy way to aggregate semantic data
- TalkMap - Online debating
Email me your own: <eric.abouaf at gmail>